You can use this AFO to maintain service points for Reservations messaging and/or Stack requests.
Reservation Messaging is a feature for Vubis reservations and requests that provides a means of tracking the progress of reservations across the system. Staff in libraries are alerted quickly to items that are on their shelves that can be sent to fill a reservation request. The response time from when a reservation is placed on the system to the borrower receiving the item is therefore reduced to the minimum.
Reservation Messaging is thus an extension of the Picklist feature in Vubis. Whereas the Picklist is compiled for every location that has available copies, Reservation Messaging is targeted at specific locations according to a route list determined by the library. It also allows each Pickup location to see whether individual locations have responded to the reservation request, and to institute procedures when no items have been found to satisfy the request.
The reservation messaging subsystem aims to quickly select an available item which can satisfy a reservation from a set of preferred locations.
For any pickup location, you may define a list of “service points” which define the preferred locations from which an item may be selected to satisfy a reservation. For example, for a reservation which is to be collected from library branch A, you can choose to ‘target' branches P,Q and R to find an available copy.
Unlike the standard AFO 418 picklists, which identify any location which has an available copy of a title, the reservations messaging selects a specific copy, highlighting this to the service point responsible for retrieving and dispatching the copy. If such a service point fails to respond or responds negatively (e.g. by telling the system that the selected copy is missing), the system can be configured to move on to find another service point which has an available copy.
An individual staff user can be set up to be considered to be working at a service point. The service point is therefore a set of book locations for which such a user has responsibility – and can be configured very broadly or in some detail – for example, it could be a whole institution, a set of locations or even a range of shelfmarks. Reservations for which the system has identified an available copy are identified to users who have a corresponding service point. Permissions for a staff member are set via AFO 611 – Passwords – Add/modify logins – option Service point.
The subsystem is driven by a background job which runs automatically at user defined intervals, perhaps as often as every 5 or 10 minutes, selecting recent reservations and identifying messages for which no action has been taken.
This is an optional feature that every customer can decide whether to implement or not.
For some libraries, particularly larger Academic libraries, there may exist significant material which is not available on open access shelves. Typically, therefore, readers are required to enter “requests” for such material, which must be retrieved and delivered by library staff. One of the key functions of the stack request processing is to “deliver” this request (e.g. by printing it out) to a service point most appropriate to the location of the work.
Depending on the location of this material, the time taken to deliver may be measured in minutes, hours or even days. Another key task of the system is to offer some guidance as to estimated delivery schedules.
Such material will be delivered to an appropriate location, either for subsequent collection by the reader, or for direct delivery to, for example, a specified table in a reading room.
Material may, according to library policy, be issued in the regular way and be removed from the library or may be used within the library only. In this latter case, the system needs to handle situations where the reader wishes to read the material on subsequent days, or where there exists a queue of readers for the item.
Last but not least, the system must allow the reader to monitor the progress of their request; and to inform them automatically, and immediately, when, for example, the material is available for collection.
Not only must the system allow for the delivery of material this way, but it will also control this process. For example, the staffing of a service point may only allow for so many requests to be managed per day, so the system will be capable of applying limits on the number of requests placed to a service point. It will also allow for emergencies – for example, if a delivery van breaks down, so that readers do not continue to place requests in the expectation of a quick delivery, when there is no chance of the library supplying the material.
Finally, although the system is designed to allow the library to monitor and control of requests and their delivery in a very detailed and proscribed way, the system configuration will allow for more simple and straightforward library environments.
This is an optional feature that every customer can decide whether to implement or not.
See also the general information on this subject.
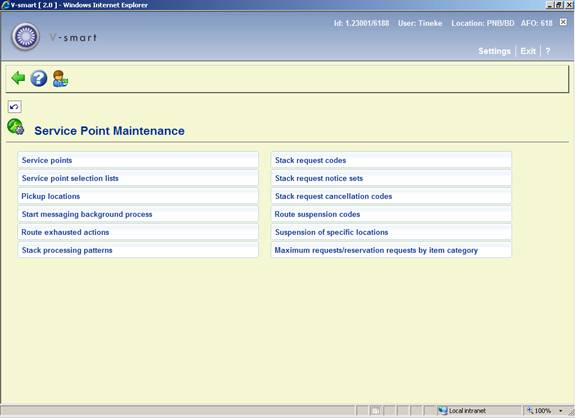
After choosing this AFO you will be presented with a submenu:
· Service points relate to both reservations messaging and stack requests
· The following options relate to reservations messaging only:
- Service point selection lists
- Pickup locations
- Start messaging background process
- Route exhausted actions
· The following options relate to stack requests only
- Stack processing patterns
- Stack request codes
- Stack request notice sets
- Stack request cancellation codes
- Route suspension codes
- Suspension of specific locations
- Maximum reservation requests by item category
The various options are described in detail in the paragraphs below.
Below are two sections. One details the setup required for reservations messaging, the other deals with the setup for stack requests.
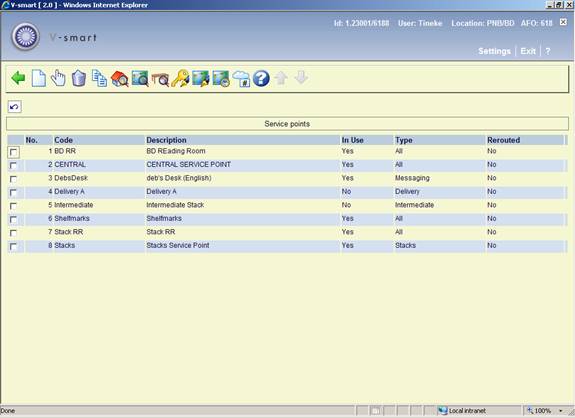
After choosing this option the initial screen shows you the currently defined Service points for the current meta-institution:

: use this option to add a new service point. See section 618.3.1.1 for details.
: select a line and then this option to view or modify the information. See section 618.3.1.1 for details.
: select a line and then this option to delete the service point. The system will prompt for confirmation.
: select a line and then this option to create a new service point based on information in the selected record.
: select a line and then this option to view or modify the details of the locations which are dealt with by the selected service point. See section 618.3.1.2 for details.
: This option is related to stack requests. See section 618.3.2.
: This option is related to stack requests. See section 618.3.2.
: This option is related to stack requests. See section 618.3.2.
: This option is related to stack requests. See section 618.3.2.
: This option is related to stack requests. See section 618.3.2.
: This option is related to stack requests. See section 618.3.2.
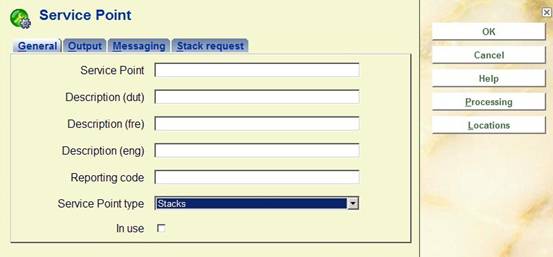
After choosing the or option you will be presented with a tabbed input form.

Service point: enter a unique code for the service point. For an existing code this field is protected and cannot be modified.
Description (language): enter a brief description in each language.
Reporting code: optionally enter a code (free text) for statistical purposes.
Service point type: specify that the service point is to be used for Messaging.
In use: check this box to denote the service point is in use. Service points can be set to inactive rather than completely delete them, if desired.
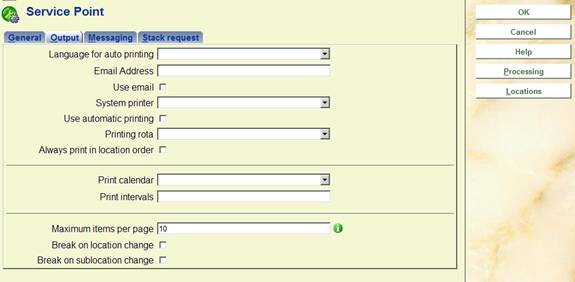
These fields are reserved for future use; a later version will allow for the automatic printing of the items on the picklist. This tab allows the various relevant settings to be assigned.
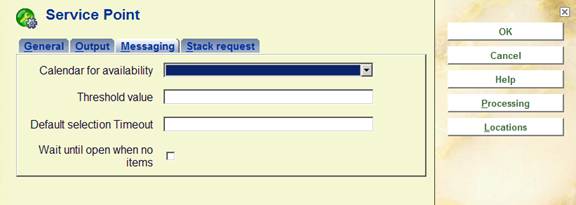
Calendar for availability: allows you to define the dates and times at which this service point is to be considered for selecting an item. For example, if this (set of) location is closed on Wednesday, then the availability calendar would be set to closed from Tuesday afternoon, until Wednesday evening. For this period, the system would not bother to consider items at locations covered by this service point, since no-one would be around to collect and dispatch the items. The Calendar used here is defined in AFO 622 – Calendars. You should note that such calendars allow not only whole days to be marked as closed but also specific time periods within any given day.
Threshold value: allows you to limit the number of items selected for this service point per day.
Selection Timeout: determines for how long an item selected will stay on the picklist for this service point. It may be entered in the form “days hour:minutes” – for example, an entry “3 4:30” will leave a selected item on the messaging picklist for 3 days, 4 hours and 30 minutes. If the item has not been picked after this time, then the system will move on to try another service point. This can be overridden in the setup when the service point is linked to a pickup location.
Wait until open when no items: check this box to have the system wait until the service point is open to check if there are items available (otherwise the system will skip this Service point).
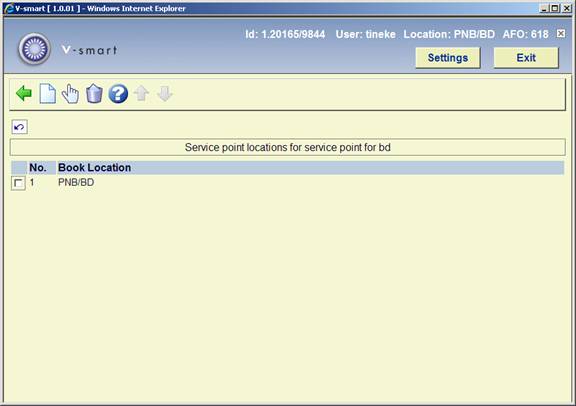
: select a line and then this option to view or modify the details of the locations which are dealt with by the selected service point. After choosing this option an overview screen will be displayed:
: use this option to add a location to the selected service point. An input form will be displayed:

You can select a institution/location combination from the dropdown list. Optionally you can add a sublocation and/or shelfmark to restrict the use of this service point.
Characters to drop when matching: This setting allows the user to tell the system to DROP certain characters from the shelfmark being tested. Thus, for example, punctuation may be stripped before testing. If this is used, then the range entered should NOT contain these characters! (This is not checked!)
Notes
The location field allows for “wild cards” to be entered using a “*” – for example, “PNB/BR*” will select any location starting “BR” for institution PNB.
Shelfmark ranges may also be entered as explicit ranges, or in the form “438.4-“ or as “43*”. If a numeric range is entered, and then the test for a numeric shelfmark will be numeric; otherwise the test will be character by character. A little thought therefore needs to be given to setting up such ranges, particularly if you use cutters on your shelfmarks.
With a range of FRW14 – FRW255 the question is: should (for example) the shelfmark “FRW34” be considered to lie within this range. It depends, of course, as to whether the shelfmark is treated as FRW followed by the number or whether the shelfmark should be considered character by character.
In order to allow users to be more explicit, the range may be entered in the above form. If a range is specified with { } brackets, then the treatment of the matching is split into two steps. The “prefix” is treated first, so that the shelfmark being checked must begin with “FRW”. The remainder is then processed according to the range inside the {}s. In this example, the range is purely numeric, so the shelfmark will be tested NUMERICALLY rather than character by character. Checking (say) FRW34 – the 34 lies between 14 and 255 and therefore the shelfmark IS considered to lie in this range.
: select a linked location and then this option to view or modify the details. See the information under for details of the input form.
: select a line and then this option to delete the link between location and service point. The system will prompt for confirmation.
After choosing this option the initial screen shows you the currently defined Service points for the current meta-institution:
: use this option to add a new service point. See section 618.3.2.1 for details.
: select a line and then this option to view or modify the information. See section 618.3.2.1 for details.
: select a line and then this option to delete the service point. The system will prompt for confirmation.
: select a line and then this option to create a new service point based on information in the selected record.
: select a line and then this option to view or modify the details of the locations which are dealt with by the selected service point. See section 618.3.2.2 for details.
: takes the user to the screens for the maintenance of routes from the specified service point. See section 618.3.2.3 for details.
: allows individual table identifiers to be added to a reading room type of service point. See section 618.3.2.4 for details.
: allows you to specifically exclude item categories for specific types of borrower. See section 618.3.2.5 for details.
: allows this service point to be re-routed. See section 618.3.2.6 for details.
: allows for the maintenance of shipping periods between locations. See section 618.3.2.7 for details.
: allows for the maintenance of route suspended codes. It is the same as the menu option Route suspension codes. See section 618.5.1 for details.
After choosing the or option you will be presented with a tabbed input form.
Service point: enter a unique code for the service point. For an existing code this field is protected and cannot be modified.
Description (language): enter a brief description in each language.
Reporting code: optionally enter a code (free text) for statistical purposes.
Service point type: specify that the service point is to be used for Stack requests.
In use: check this box to denote the service point is in use. Service points can be set to inactive rather than completely delete them, if desired.

Most of these fields are reserved for future use; a later version will allow for the automatic printing of the items on the picklist. This tab allows the various relevant settings to be assigned.
Printing rota: Optionally select a printing rota (as defined in AFO 621) from the dropdown list.
If a printing rota is linked to the service point, the printer for a stack request automatic output will be selected based on the following logic: the system will check the time against the linked rota and if there is a printer defined for the current time select that printer.
If not, then the system will select the printer defined in the field “System printer”. For the selected printer, the system will follow the logic for individual printers defined in AFO 621 in order to see if the printer is individually rerouted or it has a rota assigned.

Location type: determines the type, choices are:
· stacks only
· an intermediate location
· a delivery point
· all of these
Processing pattern: This is a link to a separately maintained “processing pattern” (defined elsewhere within AFO 618).
Notice set: Specifies a set of output formats associated with this location (defined elsewhere within AFO 618).
Calendar: Specifies the availability calendar to be used (as defined in AFO 622).
Notification delay in minutes: This setting suspends the actual output or email of an availability notice for a few minutes. This allows time for staff to cancel the action in the event of a problem.
Period te keep current if no queue: How to handle the item on checkin from a reader if there is no queue.
Period to keep current if reservation queue: How to handle the item on checkin from a reader if there is a reservation queue.
Management of request queues: This can be set to “Treat equally” or “According to queue”.
Transit to other library: If a new stack request is found when the item is returned, this determines how the processing should be carried out.
Requestor can reserve first: Allows current reader to “renew” the item in preference to others when there is a queue.
Adjustment for postdated requests: This is reserved for possible future use.
Offline barcode: This is used for offline processing; only valid for reading room service points.
Offline pseudo location: This is used for offline processing; only valid for reading room service points.
Standard reservations allowed: IF standard reservations are allowed on stack copies, then we need to consider what happens if a stack request copy is “on the shelf”. For example, although we may disallow standard reservations on titles for which there are copies available, should this apply to the stack copies.
The first option can be used to override the system wide setting as to whether reservations are possible on stack request items, for each individual service point.
The setting of this parameter influences what happens with requests placed via the Webpac:
- This is the simplest situation – we simply drop into the regular reservation processing.
· If standard reservations are allowed on stack copies
- If no stack requests can be placed because no copy is immediately available, AND reservations requests are not allowed, then the system will display a message to inform the borrower that no requests can be placed BUT that a regular reservation can be placed on the title, giving them the opportunity to cancel or otherwise continue to place a reservation.
- If a stack request can be placed on at least one copy, then the user is offered a choice
· If standard reservations are NOT allowed on stack copies
- In this case, there is no intermediate screen - the system will drop straight through to the stack request processing.
· Some copies are reservable and some are stack request copies
- If no stack requests can be placed because no copy is immediately available, AND reservations requests are not allowed, then the system will display a message to inform the borrower that no requests can be placed BUT that a regular reservation can be placed on the title, giving them the opportunity to cancel or otherwise continue to place a reservation. (This is the same condition as the first part of section If standard reservations are allowed on stack copies.”)
- Otherwise: The borrower will be offered the option to place a reservation or a stack request (as the condition above).
: select a line and then this option to view or modify the details of the locations which are dealt with by the selected service point. After choosing this option an overview screen will be displayed:

This listing screen shows the locations covered by the service point. This defines the locations from which items are retrieved (or ultimately returned to) and therefore only applies to a Stacks service point type.
: use this option to add a location to the selected service point. An input form will be displayed:

You can select a institution/location combination from the dropdown list. Optionally you can add a sublocation and/or shelfmark range to restrict the use of this service point.
Characters to drop when matching: This setting allows the user to tell the system to DROP certain characters from the shelfmark being tested. Thus, for example, punctuation may be stripped before testing. If this is used, then the range entered should NOT contain these characters! (This is not checked!)
Notes
For stack request type service points, you can not use wild cards in the location field.
Shelfmark ranges may also be entered as explicit ranges, or in the form “438.4-“ or as “43*”. If a numeric range is entered, and then the test for a numeric shelfmark will be numeric; otherwise the test will be character by character. A little thought therefore needs to be given to setting up such ranges, particularly if you use cutters on your shelfmarks.
When no sublocation is explicitly entered, this implies all items are part of the stack location.
With a range of FRW14 – FRW255 the question is: should (for example) the shelfmark “FRW34” be considered to lie within this range. It depends, of course, as to whether the shelfmark is treated as FRW followed by the number or whether the shelfmark should be considered character by character.
In order to allow users to be more explicit, the range may be entered in the above form. If a range is specified with { } brackets, then the treatment of the matching is split into two steps. The “prefix” is treated first, so that the shelfmark being checked must begin with “FRW”. The remainder is then processed according to the range inside the {}s. In this example, the range is purely numeric, so the shelfmark will be tested NUMERICALLY rather than character by character. Checking (say) FRW34 – the 34 lies between 14 and 255 and therefore the shelfmark IS considered to lie in this range.
If an entry is made for, say, location PNB/CEN, sublocation STACK, shelfmarks 350-499; then the system WILL assume that ALL items at PNB/CEN [STACK] can have stack requests placed against them. Similarly if at least one entry exists at the Location level e.g. PNB/CEN 350-499, then the system assumes that all items at this location may be managed by the stack request processing.
: select a linked location and then this option to view or modify the details. See the information under for details of the input form.
: select a line and then this option to delete the link between location and service point. The system will prompt for confirmation.
: takes the user to the screens for the maintenance of routes from the specified service point. This is only valid for service points defined to be a stack location (or a reading room/delivery location, if separate routes back are to be defined). The initial display shows the routes from this service point to other service points.

: Use this option to add a new route. See below.
: Select a line and then this option to view / modify the details of a route. See below.
: Select a line and then this option to delete the route. The system will prompt for confirmation.
: Select a line and then this option to create a new route based on details of the selected route.
: Select a line and then this option to define the route locations and the processing details. See below.
: Use this option to test if the parameters entered have the desired result. See below
The options and lead to the display of overall details for the route.
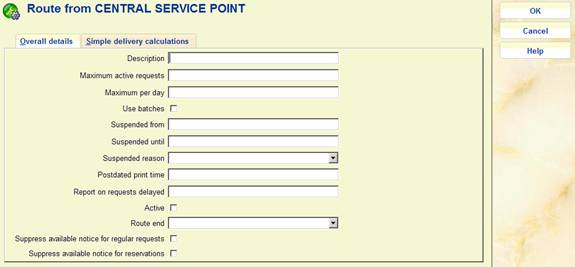
Description : A textual description of the route.
Maximum active requests: This is a limit on the number of currently active requests on this route. (This is, of course, only used on routes from a stack location to a delivery location; not for returns!)
Maximum per day: Allows a limit on the number of requests placed in total for this route on a given day. See Technical section on counting.
Both of these are implemented by imposing a logical suspension on the route – the suspension code MUST be entered in the system wide options
Use batches: Determines whether items delivered between these two locations are processed as batches i.e. bundles of items being packaged up to ship items in bulk.
Suspended from / until: The “until” setting is optional and if suspended an empty entry here implies that the route is suspended indefinitely.
Entries here would be in the form of a date and a time e.g. “23 Jan 2008 11:30”. Either of these are optional – a date on its own would imply that the route is suspended from one second past midnight on the 23rd Jan.; a time only would imply that the route is suspended from “today” at 11.30.
Suspended reason: This allows a code defining a reason for the suspension to be entered. This allows a specific message to be displayed to borrowers attempting to borrow this way.
Post-dated print time: Defines how to handle post-dated requests.
Report on requests delayed :During the processing of a request, the system recalculates the estimated delivery time. If this appears to be delayed by more than this setting (in minutes), then an email is sent to the requester. (Only email is supported)
Active: Implies the route is active (although it may be suspended). A route being ‘entered” would typically have Active off until it has been configured.
Route End: This defines the service point which constitutes the end of this route.
Suppress available notice for regular requests and Suppress available notice for reservations: when a requested title becomes available for collection, a notice may optionally be generated to go to the borrower. (This may be delivered by email or by post). The available notice may be suppressed entirely.
It is, however, necessary to make a distinction between a reservation and a request for an available item. In the case of an available item, there may be no need to create an available notice, especially if the time taken to retrieve the item is short. In this case, the borrower can assume that the item will be delivered more or less at once, and we don't need to inform the borrower. For a reservation, on the other hand, the borrower is waiting for their turn, so it is appropriate to send a notice.
Note
The Stack request background job loops (more or less) continuously, checking amongst other things whether an available notice is required. If it should be sent by email, then the job WILL send the email immediately, otherwise a printed notice is “prepared” ready for printing when the library staff feel it is appropriate. The available notices are NOT only generated as an “overnight” job.
The second tabbed part of this form can be used to enter a very “simple” route, and avoids having to enumerate the individual parts of the route. (as described below).
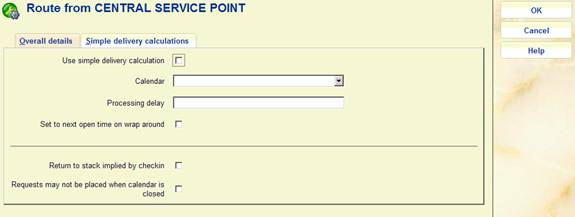
Use simple delivery calculation: This turns on the use of this “simple” calculation
Calendar: A calendar which defines the availability times of the route (see below for fuller explanation).
Processing delay: An entry in the form “30M”, “4H” or “2D” where M is minutes, H hours, D days (and the character will be shown in an appropriate form for the current user's language).
Set to next open time on wrap around: What to do when the processing delay takes the expected delivery time to the next day.
Return to stack implied by checkin: When this option is checked and an item is checked in, then the system will ASSUME that the item is returned to its home location. It is NOT Set Aside etc and then to be rerouted back to the stacks location. Essentially this then means that the Request is completed, and the item is available at once for another request.
Requests may not be placed when calendar is closed: If you selected a calendar above, then you can use this option to deetrmine if requests can also be placed when the stack is closed (as per selected calendar).
: Select a line and then this option to define the route locations and the processing details. An overview screen will be displayed:
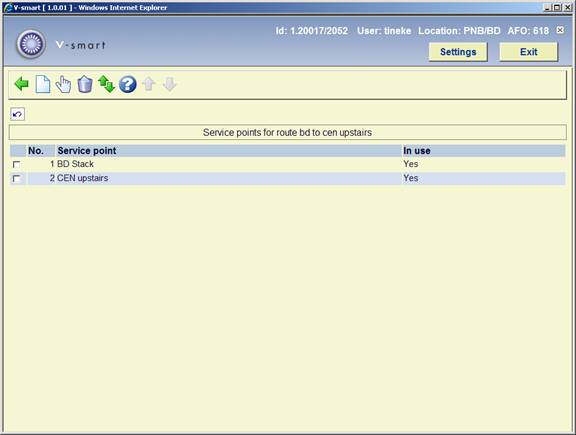
This is a simple list of the service points on the route. It also shows the service points' current status. Very often this will only have two entries i.e. the start and end points.
: Use this option to add a new location (specific service point) to the route. An input form will be displayed:
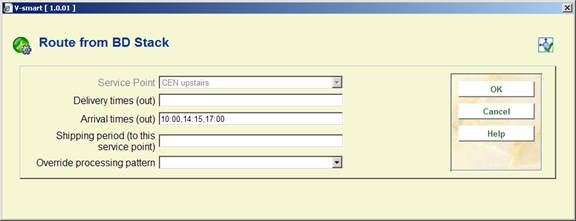
Service point: This is a combo dropdown list of the possible service points.
Delivery times (out) and Arrival times (out): For a specific route, the item may be delivered by scheduled delivery vans or even by internal mail. The Delivery and arrival times settings allow the system to record specific times that items are delivered from or arrive at this service point.
Delivery and arrival times are both optional settings; if undefined, then the system treats the calculation of estimated final delivery time as if there were a continuous flow of items through (or to) the service point.
Delivery times are ignored for the end service point; as, of course, arrival times for the starting point. They may however be defined for both since the converse is true when calculating the “return” path for an item.
The arrival time and delivery times are therefore a function of the specific route being configured
Shipping period (to this service point): This is the estimated time to ship from the previous service point (or the start point) to this service point. Entry may be in the form 30M, 2H, or 1D. This is optional – if the shipping periods settings are defined then the system will use these.
Override processing pattern: The settings associated with the processing carried out on an item is defined in the Processing pattern linked to a service point. This is described below, but in summary it defines elements such as how long it takes to retrieve the item from the shelves. The processing pattern, as its name suggests, therefore defines things associated with the processing of the request.
As outlined, the processing pattern allows explicit processing times (and more) to be defined. However, it is also possible to assign a processing pattern specific to this service point/route combination, if circumstances suggest that this added processing might differ between the two (or more) routes.
: Select a line and then this option to view / modify the details of a location. A form like the one above will be displayed.
: Select a line and then this option to delete the location. The system will warn in case you try to delete a start or end service point.
: This option allows intermediate service points to be moved up or down the listing. The order of service points is therefore maintained by the staff. A form will be displayed:

The exception to this is that the end point must be a reading room (or a stack location for a returning route). The system will ensure that such a service point is the final one in the list; if no such service point has been entered a message to that effect will be shown in the listing border. Only one such service point may be added to a list; all others must be intermediate service points.
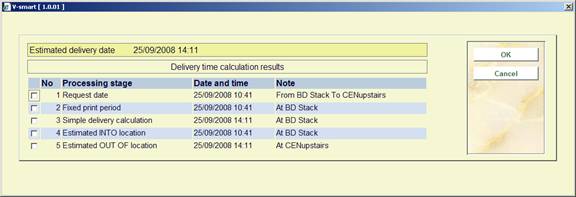
: Use this option to test if the parameters entered have the desired result. An input form will be displayed:

: allows individual table identifiers to be added to a reading room type of service point.
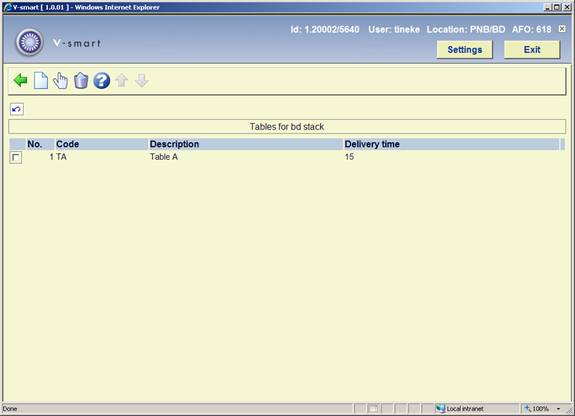
This listing shows the tables defined for the current service point.
: Use this option to add a new table to the service point. An input form will be displayed
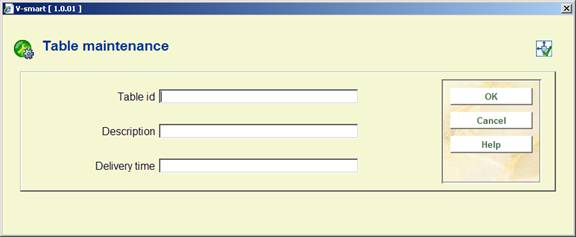
Table id: A unique identifier for the table.
Description: A free text description.
Delivery time: An extra delivery time allowance can be added – this will simply be added to the final estimated delivery time. This is completely optional.
: Select a line and then this option to view / modify the details of a table. A form like the one above will be displayed.
: Select a line and then this option to delete the table. The system will prompt for confirmation.
This option allows you to specifically exclude item categories for specific types of borrower, separately for each service point.
If such a limit has been set, corresponding items will show up in AFO 421 with a red cross in the left hand column. You can not select such an item to place requests.
After selecting this option the following form will be displayed:
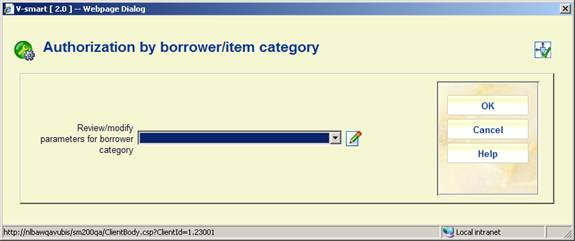
Choose a borrower category from the dropdown list and click :

· For each item category uncheck the ones that may NOT be requested and click .
BY DEFAULT, all item categories are checked as “on” for all borrower categories.
· In case there are more than 15 item categories, there will be a button to go to the next screen.
· The button allows you to go directly to a specific item category.
: allows this service point to be re-routed. For Stack locations, a service point may be temporarily rerouted to be processed by another service point. After selecting this option, an input form will be displayed:

The above form tells the system that the selected service point is rerouted to “Upstairs” between 14:00 and 18.30. This is only a temporary setting.
Any request which would have been processed at the selected service point will now be processed by the “Upstairs” service point; effectively this is as if the Locations settings attached to the service point have been moved to the “Upstairs” service point temporarily.
: allows for the maintenance of shipping periods between locations. For the selected service point, the shipping period to reach any other service point may be defined. Whether or not items ARE shipped between this service point and the other is actually defined in the route definition above, of course.
After selecting this option, an overview screen will be displayed:

: Use this option to add a new period to the route. An input form will be displayed:
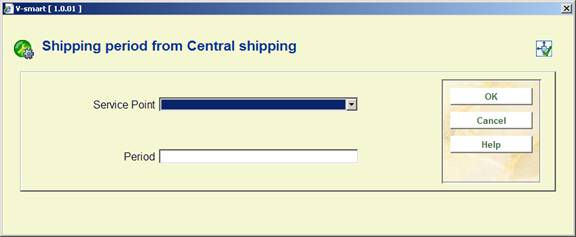
This allows a service point to be selected from the dropdown list and the period assigned (in the format 00M).
: Select a line and then this option to view / modify the details of a period. A form like the one above will be displayed.
: Select a line and then this option to delete the period. The system will warn in case you try to delete a start or end service point.
The aim of the reservation messaging is to get a copy of the title to its pickup point as efficiently as possible. For each pickup location, you should define a list of locations (i.e. service points) which are to be consulted preferentially for available copies; typically this would represent locations which are geographically close or which are perhaps served by the same van delivery schedule. After choosing this option an overview screen will be displayed:
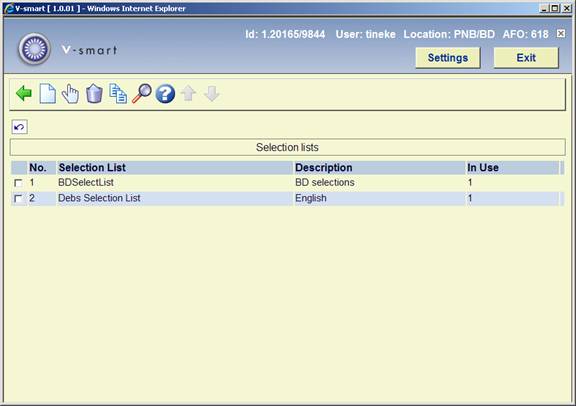
: use this option to add a new selection list. See section 618.4.2.1 for details.
: select a line and then this option to view or modify the information. See section 618.4.2.1 for details.
: select a line and then this option to delete the selection list. The system will prompt for confirmation.
: select a line and then this option to create a new selection list based on information in the selected record.
: select a line and then this option to view or modify the details of the selected service point list. See section 618.4.2.2 for details.
After choosing the or option you will be presented with an input form:

Selection list: enter a unique code for the selection list. For an existing code this field is protected and cannot be modified.
Description (language): enter a brief description in each language.
In use: check this box to denote the selection list is in use. Selection lists can be set to inactive rather than completely delete them, if desired.
: select a line and then this option to view or modify the details of the selected service point list. After choosing this option an overview screen will be presented:
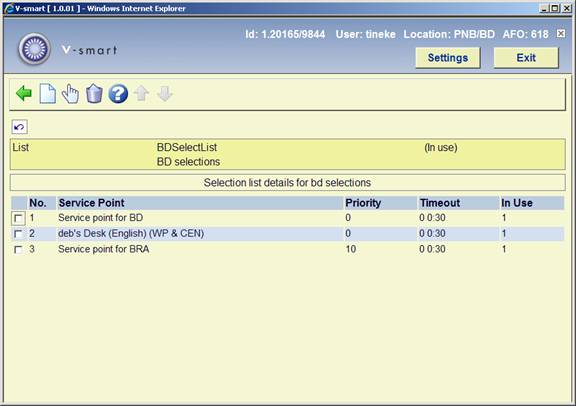
: use this option to link a new service point. An input form will be displayed:

For each service point on the list, you can define a priority –a lower number means a higher priority. Thus for example one might choose to prioritise the main library over a small branch library when trying to find an available copy of a title; or prioritise a closer branch over a more remote one.
A timeout period may also be defined which would be used in preference to the timeout allocated to the service point.
: select a line and then this option to view or modify the information. See the information under for details of the input form.
: select a line and then this option to delete the service point. The system will prompt for confirmation.
Use this menu option to relate the Pickup locations to the service point lists. After choosing this option an overview screen will be displayed:

: use this option to add a new pickup location. See section 618.3.3.1 for details.
: select a line and then this option to view or modify the information. See section 618.3.3.1 for details.
: select a line and then this option to delete the pickup location. The system will prompt for confirmation.
: select a line and then this option to create a pickup location based on information in the selected record.
After choosing the or option you will be presented with an input form:
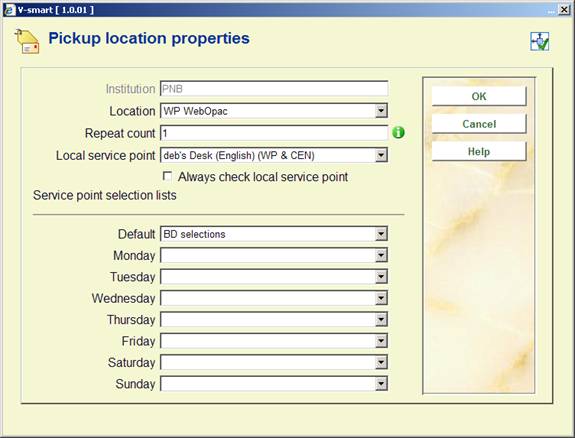
Institution: protected field; contains the code of the institution where you are currently logged in.
Location: choose the right location manager (as defined in AFO 461) from the dropdown list.
Repeat count: lets you tell the system how many times to cycle round the service points on the list to find a copy. It is possible to try several times to find a copy – even if one or more service points on the list have chosen to ignore the “message”.
Local SP and Always check local service point: are used, optionally, to tell the system which service point corresponds to the locations which are local to the service point (e.g. typically, a service point will represent branch libraries – which branch library corresponds to the pickup location ?).
This has two points of significance:
· You may wish to set up a single service point selection list for a group of libraries (for example, the “central Bristol branches”. This list can then be shared by all such branches; however we would almost invariably want to preferentially select an available item from the local service point (i.e. if there is an item available at the pickup point, then we would pick that first!). Setting the local service point entry effectively assigns THIS service point as having the utmost top priority, regardless of the setting on the (shared) service point list.
· Always check local service point – by setting this, you tell the system to keep on trying the local service point for an available copy, even though a previous request for a copy has been ignored. (Thus for example, by setting this you might end up with the following cycle – try “Local branch”, try “branch P” – try “Local branch” again – try “branch Q”- try “Local” once more… and so on.
Service point selection lists: First of all, you should note that you can use different service point lists according to the day of the week. This allows for some quite subtle fine tuning of the messaging subsystem; in particular, you might like to configure the selection lists to match your van delivery/collection periods, tailoring these to each day of the week, corresponding to the days for the van routing.
You should also remember that you do not need to set up different lists to allow for branches (service points) being closed – this is handled by defining an appropriate calendar for the service point.
This option allows you to start up the messaging processing job. This processes the reservations, searching through the defined lists for each pickup location, moving reservations through the lists as necessary. After choosing this option an input form will be displayed:
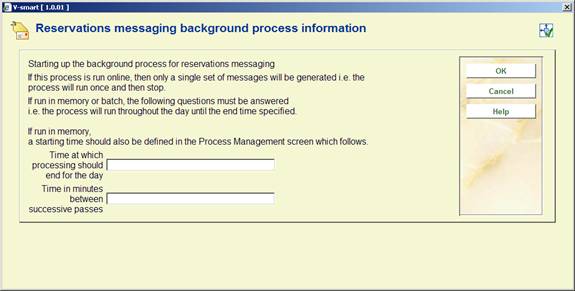
You should enter a time at which the processing should end e.g. “22:00”. In addition, enter a value in minutes for the successive passes (to how often the job should run to check through the reservations).
Note
The processing is quite intensive so, for performance reasons, you should run this as infrequently as possible but commensurate with the sorts of timeout periods you have chosen for your service points.
For example, if you typically allow each service point 3 days in which to respond to a “message”, then it is probably inappropriate to run the background process every 5 minutes!.
After clicking , you are then offered the standard screen for submitting a “process”. Normally you would schedule this in memory. However, you CAN run the process online or in batch. In this case, the processing will run ONCE only, rather than looping indefinitely; and this option would normally be used for testing.
It is possible to assign specific actions to “messages” appearing in the “route exhausted” display (AFO 418). This allows you to define specific actions or statuses to be assigned to messages appearing in the list.
After choosing this option an overview screen will be displayed:

: Select this option to create a new code. See section 618.4.4.1.
: Select a code and then this option to delete it. The system wil prompt for confirmation.
: Select a code and then this option to modify it.
: Select this option to create a new code. An input form will be displayed:
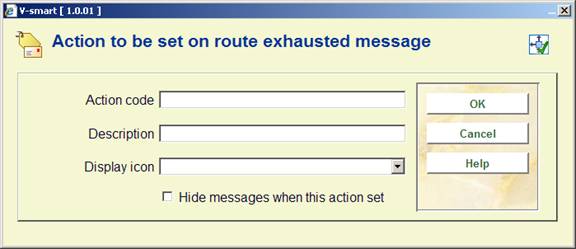
Action code: code to be assigned to this action.
Description: A description of the code.
Display icon: An icon which will appear against the messages in the route exhausted display, when this action is set against the message. This is a drop-down field – the system offers you a choice of about 16 different icons.
Hide message: This tells the system to remove the message from the display when this action is set. For example, when applying a status of “completed”, you might decide to remove this message from the display completely. You should note that the message itself is not deleted from the system – only hidden; by reversing the “hide message” setting, such messages will be made visible again.
This menu option allows the library to specify processing times for specific activities at a service point. There are two aspects of this – SEARCH times to find the item, and subsequent POSTSEARCH processing times.
These settings are independently defined and then linked to specific service points.
After selecting this menu option, an overview screen will be displayed:

: use this option to add a new pattern. See section 618.5.1.1 for details.
: select a line and then this option to view or modify the information. See section 618.5.1.1 for details.
: select a line and then this option to delete the pattern. The system will prompt for confirmation.
: use this to show service points linked to a specific pattern. This display is identical to the Service point listing, except only those service points linked to the selected pattern are shown.
After selecting the or option, an input form will be displayed with four tabs:

This contains the unique code and the descriptive text of the pattern.
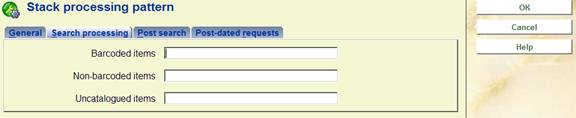
This tab defines the time to process an item. A distinction can be made between items with barcodes (e.g. regular monographs), those without (e.g., typically, serial parts) or those where the requesting reader has entered the bibliographic details manually, which typically might take longer to establish where it is to be found.

This tab defines processing periods. A default setting may be assigned, or a distinction may be made for the time required to deliver an item as compared to returning it to the shelves. (For example, it may be that new requests are prioritised, whilst returning items are “batched” up and reshelved at the end of the day).
In each case, a processing calendar CAN be defined to define when this takes place – if not allocated then the service point's calendar will be used.

This tab relates to the handling of post-dated requests. For a post-dated request, we are trying to establish for how long the item will be unavailable for other requestors. Of course, this is virtually impossible to predict – for example, if the item needs to be shipped from the stack location to satisfy the request then it will take much longer than if the item happens to be already in use at the reading room.
There is not much difference in the workflow between placing a “reservation” on the item and a post-dated request.
The Stack request code allows some general options to be entered to define slightly different “flavours” of request processing, as a function of the borrower category.
These codes are linked to borrower categories (via AFO 481 – Miscellaneous – Stack request codes per borrower category) to allow for some variations in processing or library policy according to the type of borrower.
After selecting this menu option, an overview screen will be displayed:
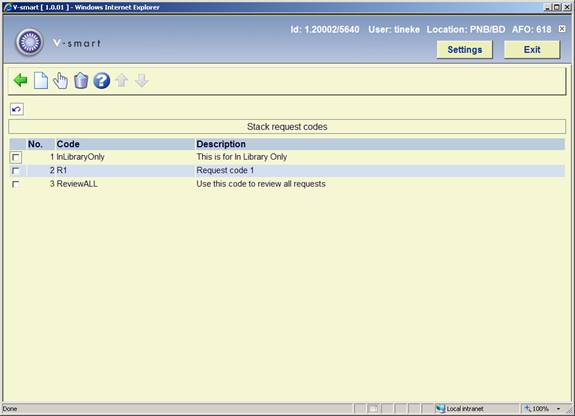
: use this option to add a new code. See section 618.5.2.1 for details.
: select a line and then this option to view or modify the information. See section 618.5.2.1 for details.
: select a line and then this option to delete the code. The system will prompt for confirmation.
After selecting the or option, an input form will be displayed:
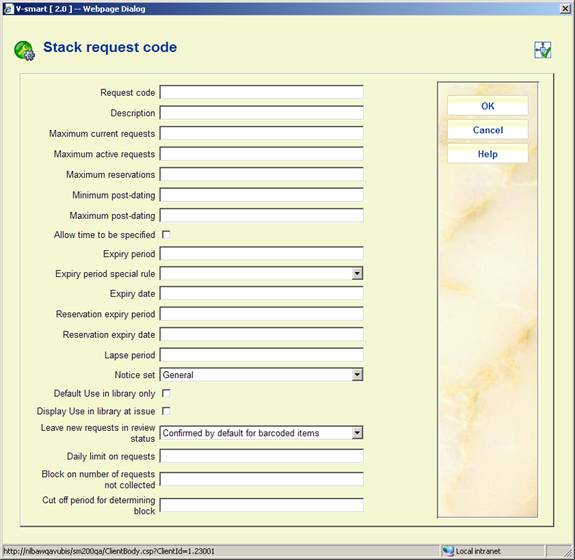
Request code: A unique identifier for the code.
Description: A free text description of the code.
Maximum current requests: Specify the maximum number of requests a borrower can have outstanding at any given time. This applies to both active requestst and reservations.
Maximum active requests: Specify the maximum number of active requests a borrower can have outstanding at any given time.
Maximum reservations: Specify the maximum number of reservations a borrower can have outstanding at any given time.
Notes
If Maximum current requests is set to 10, and Maximum active requests and Maximum reservations to 5 each, this would work OK.
Say the borrower has reached the full maximum. At some point, one of the reserved items may be trapped for the borrower and then become “active”. They would therefore have 6 active items and 4 reservations; the system will not prevent this; but would, of course, continue to prevent them from creating new requests. In other words, these settings only apply at the specific moment that the borrower attempts to request another title.
If Maximum current requests is set to 8 and Maximum active requests and Maximum reservations to 5 each, this is interpreted as meaning that they can have up to 5 active, 5 reservations but no more than 8 in total.
Minimum post-dating and Maximum post-dating: These define how far in advance a post-dated request may be entered, or conversely a minimum period, in days.
Allow time to be specified: Whether a reader can specify a specific time required.
Expiry period and Expiry date: The point at which a request is considered to have expired. This can be set to a number of days, hours or minutes. A specific DATE can also be set.
Expiry period special rule: In some situations, it is necessary to be more precise about the request expiry period. For example, the library may allow a borrower to place a request for an available item in the morning, and expect them to collect the book by the evening (let's say 18:00 that day).
In this situation, if the item is NOT collected by that time, the request is considered to be expired and the work is available for another borrower to request, with the implication that they can collect the book more or less immediately.The expiry date and time is therefore particularly significant in this situation. In order to allow the date and time to be calculated precisely, you can define special rules in AFO 815, which can then be linked here.
Reservation expiry period and Reservation expiry date: The point at which a reservation is considered to have expired. This can be set to a number of days, hours or minutes. A specific DATE can also be set.
Lapse period: This field is used to determine for how long the item is held on the reservation shelf for the requesting borrower to come and collect it.
For a regular request (i.e. for a title that was available immediately) the Lapse date and time will be set to the Expiry date; however for a reservation, the LAPSE period defined here will be used.
Notice set: Select a notice set from the dropdown list if requried. See section 618.5.3 for details.
Default Use in library only: When this option is checked the default value for this type of request is “use in library only”.
Display Use in library at issue: When this option is checked the system will pop up a warning message for “use in library only” when the item is issued.
Leave new request in review status: This is used in conjunction with borrower self-registration via the WebOpac. The idea is that self-registered borrowers will normally have a special borrower category – this can then be linked to a Stack Request code with this option set to "Never confirmed" – which means all requests entered will therefore be set to pending until staff have been able to review them.
Setting this option to "Confirmed by default for barcoded items" means requests for barcoded items are processed in the normal way (not set to Pending).
Setting this option to “Always confirmed” means that any request, even for non-catalogued items, is created as “Confirmed” – this means that it WILL get printed, and never appear in the “Pending” display. If this is used, then requests for borrowers linked to this code can NEVER be set to pending.
Daily limit on requests: This option allows to set a limit per day on requests placed by or for borrowers linked to this code.
Block on number of requests not collected: If a borrower fails to collect requested items, then the system will create a “block” (in the usual way) against their record. This block will ONLY apply to the ability to place stack requests.
Cut off period for determining block: This determines the period in which the number of occurences must appear for the block to be applied.
Example: if the number is set to 10 and the period to 730, then the block will be applied as soon as they have missed collecting 10 items within a 2 year period.
A “notice set” basically defines the layouts of a set of related notices. There are two types of notice set in the context of stack request maintenance – notices which are to be sent to a borrower, and independently the actual printed stack requests themselves (with possibly slightly different characteristics dependent on the context in which the notice is needed to be printed, explained below).
Stack request notices are “attached” to the service point setting – i.e. the layout can be (but need not necessarily be) defined slightly differently for each relevant service point.
After selecting this menu option, an overview screen will be displayed:

: use this option to add a new set. See section 618.5.3.1 for details.
: select a line and then this option to view or modify the details. See section 618.5.3.2 for details.
: select a line and then this option to delete the set. The system will prompt for confirmation.
: select a line and then this option to view or modify the general information. See section 618.5.3.1 for details.
: select a line and then this option to create a new notice set based on information in the selected record.
: use this to set the notice types to be used and their wording. See section 618.5.3.3 for details.
After selecting the or option, an input form will be displayed:

Here you can enter or modify the unique ID and descriptive wording for the set.
When creating a new set, you must next use the option to add the actual documents etc.
After selecting the option, an overview screen will be displayed:

For Stack request, we have the following printed or emailed outputs :
1. Stack request – printed
2. Stack request – reprinted
3. Stack request – post-dated
4. Stack request – for use when item put into transit between reading rooms
5. Stack request – when item held back at the reading room
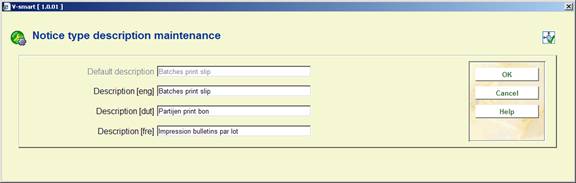
6. Stack request batch print slips – define the layout of a print of the contents of a batched set of requests.
The layout of these is defined by specifying the full name of a Word (or similar) mailmerge master document. The “notice set” is therefore the list of the names of the master documents for each of the required outputs.
Since the layouts may vary according to the location at which they are required, it is possible to define any number of “Notice Sets” – which are then linked to the relevant service point. Typically there would be only 1 such set for most institutions.
The notice set for reader notices is linked to the Stack request code – and indirectly therefore to the reader category. The wording of the following notice types can be tailored therefore to the type of reader, or specific types of notice may be suppressed.
For example, the wording might be different when addressed to an organisation rather than an individual.
It is NOT necessary to define a layout for each reader category – the notice set definition can be shared by many or all categories).
Reader notices available are
· Request available
· Request available (Reservation)
· Request cancelled
· General message
· Acknowledgement
: when selecting a line, an input form will be displayed:

This is used to to define the full path and document name of the Main document. It is possible but not necessary to define a separate main document for the Email notice. Also the Email subject can be defined here. The “paper size” field is used by the inter library loan module and not relevant here.
Save OutputSets allows each notice to always be saved as a particular file. The storage place is defined in the ini file for the print processor that will output the notice. See the help on mail merge (in AFO 483) for more information.
: This allows a separate main document/template to be defined for different contact languages. This is optional – but it allows for the fixed texts of a notice (or indeed the whole notice layout) to be changed according to the contact language of the user for whom the notice is destined.
After selecting this option an input form will be displayed:

After selecting a language, a screen similar to the main screen will be displayed (see above for an explanation). The current language will be displayed in the header of the screen:
![]()
: use this to set the notice types to be used and their wording. An overview screen will be displayed:

: after selecting a line an input form will be displayed for the wording in different languages:
: after selecting this option a form will be displayed where notices can be (de-) activated and set in a certain order.

These are codes to be applied when a request is cancelled or temporarily suspended. Apart from being useful for statistical purposes, they also define the texts which will appear on reader notifications of these events.
Please note
These settings are meta institution specific.
At least one code should be entered to cater for the reader wishing to cancel the request for their own reasons – this is set in the “General options” (in AFO 815) to be set automatically by the reader cancellation processing from the WebOPAC.
After selecting this menu option, an overview screen will be displayed:
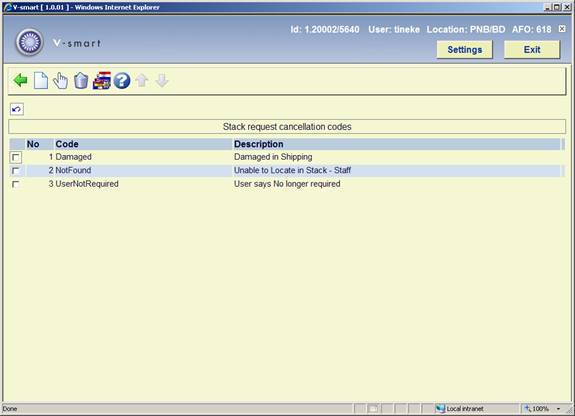
: use this option to add a new code. See section 618.5.4.1 for details.
: select a line and then this option to view or modify the general information. See section 618.5.4.1 for details.
: select a line and then this option to delete the code. The system will prompt for confirmation.
: Select a line and then this option to add a description in various languages. See section 618.5.4.2 for details.
After selecting the or option, an input form will be displayed:
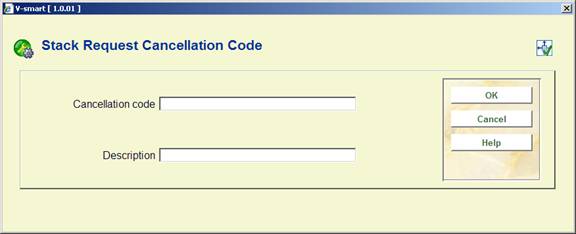
Here you can enter or modify the unique ID and descriptive wording for the cancellation code.
: Select a line and then this option to add a description in various languages. An overview screen will be displayed:
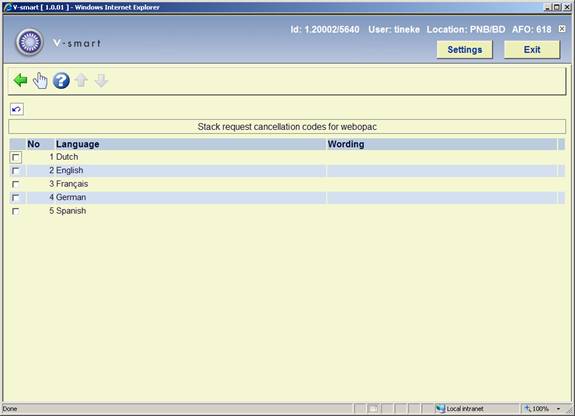
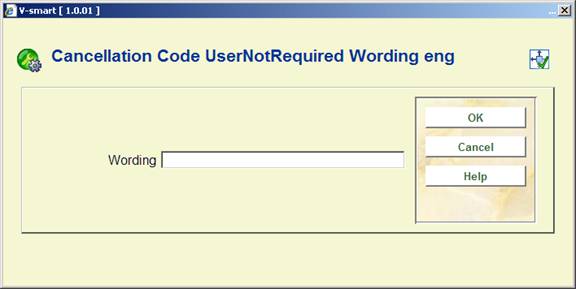
Select a line, an input form for the wording in the selected language will be displayed:
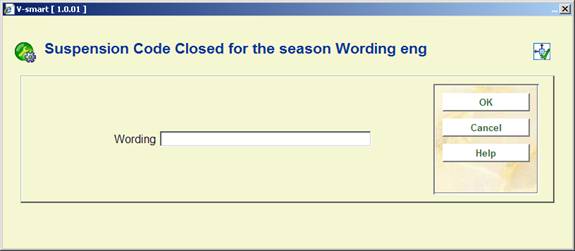
This setting simply associates some wording with a code which can be applied when a route has been suspended. Appropriate wording may be defined for the staff side, and also for use for each possible language in the WebOPAC.
After selecting this menu option an overview screen will be displayed:

: Use this option to add a new code. An input form will be displayed:

Description is purely as description for the maintenance of the code. The actual texts displayed come from the option .
Prevent requests being placed for this suspension code: When this option is checked it means that if the route the code is applied to is (temporarily) suspended, requests can not be placed.
: Select a line and then this option to view/modify the description of the code.
: Select a code and then this option to delete it. The system wil prompt for confirmation.
: Select a line and then this option to add a description in various languages. An overview screen will be displayed:

Select a line, an input form for the wording in the selected language will be displayed:
This option allows you to temporarily suspend parts of a service point. Sometimes, for a limited period, parts of a stack cannot deliver documents; this may be a subset of a route - so with this option you can define shelfmark ranges for which requests are suspended.
After selecting this menu option an overview screen will be displayed:

: Use this option to add a new code. An input form will be displayed:

Select a Location from the dropdown list. Add a sublocation and/or a shelfmark range.
: Select a line and then this option to view/modify the details of the code. An input form like the one described above will be displayed.
: Select a code and then this option to delete it. The system wil prompt for confirmation.
This option allows the library to define the maximum length of a reservation queue according to the category of the item being requested.
These parameters are set separately for each SERVICE POINT. The name of the service point is displayed at the top of the form.
After choosing this menu option a selection form will be displayed:

Select a service point and click , an input form will be displayed:
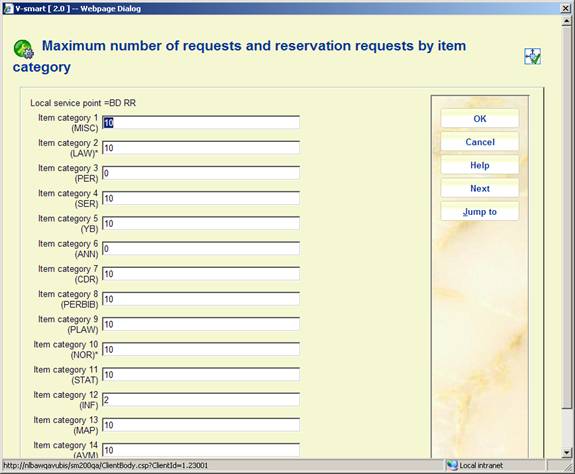
· For each item category enter a maximum if required and click .
When placing a request against an item, the system checks this maximum against the number of requests queued against the item. The setting used is determined for the service point against which the request is being placed.
This maximum INCLUDES the currently active request (if there is one, of course), so setting this value to 0, effectively precludes the item from being requested. Setting it to 1 would prevent any reservations being placed on such items, but would allow a request to be placed if the item is available.
A ‘currently active' request is one for which the item is being processed (e.g. retrieved from the stacks) or for which the item is actually on loan. In the unusual event that an item, which is normally expected to be ‘requested', has been directly loaned to a borrower, then there is no ‘currently active” request, and so is NOT counted in the limit above.
From the Staff side, if placing the request would take the number of requests above the maximum, then a warning is shown, but staff CAN override the warning.
From the WebOPAC, the option to request the item will NOT be suppressed BUT the borrower will then be told that the queue of requests for this title is too great. (If the maximum is set to 0 explicitly, then the option will be suppressed – this is a slightly different circumstance).
In addition, the wording offered when the limit is 1 (i.e. reservations are not allowed) can be set differently from the wording when the limit is >1. (In other words, there is a fundamental difference between ‘reservations are not allowed' and “there are too many reservations right now”.
· In case there are more than 15 item categories, there will be a button to go to the next screen.
· The button allows you to go directly to a specific item category.
Note
If you select a service point of type “Delivery”, the system will warn you that you need not define anything for this type of service point.
· Document control - Change History
|
Version |
Date |
Change description |
Author |
|
1.0 |
June 2008 |
creation |
|
|
1.1 |
August 2008 |
major additions for Stack requests |
|
|
1.2 |
October 2008 |
further additions for Stack requests; Part of 2.0 updates |
|
|
2.0 |
April 2010 |
new options for Stack requests |
|